Audio Equalisation: How to use it and why you should

Audio Equalisation: How to use it and why you should
I’m a filmmaker at heart, though my line of work has required that I delve into other facets of production. My background stems from audio pre & post-production. While I’ve made attempts to shake off this label, audio experience has enabled me to utilise these skill sets and apply them to the world of video & filmmaking.
Through general observation, I’ve noticed that indie filmmakers usually have limited consideration for audio. How many times have you heard the line, “Oh yeah, we’ll just get a soundie to take care of that”. In a time now where camera consumerism has gone rampant, everyone is picking up filmmaking equipment and creating content in some way, shape or form. Despite criticism from cynics, I think these opportunities present some exciting times ahead.
Perhaps one of the least talked about aspects of post-production in audio is the need to understand further fundamentals; especially the final quality when one delivers a product “worthy” of commercial value.
When one shoots footage, be it narrative, documentary, corporate, commercial, wedding, or any other work, we always adhere to and utilise elements such as correct and appropriate frame rates, shutter speed rules, composition, framing, colour temperatures, colour grading, and so on.
Particularly when it comes to colour temperatures and grading, there is always more work required in post should you wish to give your film or video a stylised look or treatment.
With the abundance of “prosumer” audio recorders now readily available on the market, DSLR filmmakers are purchasing audio “companion kits” to supplement their sound needs. In most cases, it’s afterthought. No pun intended.
There seems to be a culture around now that perpetuates the use of these devices where audio is captured and then conveniently synced to your footage in post, all marketed around user-friendliness and convenience.
A prime example would be to capture your audio into an audio recorder whilst shooting, then simply transferring your sound bytes once finished, from card to computer into your NLE. Then simply sync and you’re done. Unfortunately, that’s only the tip of the iceberg.
So therefore, let me pose this question; Why is it that while we always observe colour temperatures while shooting, apply colour correction and grading in post, that we do not prioritise the same necessities when it comes to audio?
The more experienced editors will generally send their files to a sound editing program for further tweaking, then round trip back into their NLEs for the final cut.
While some of you will have your “weapon” of choice, whether using the audio functions, filters and parameters in Final Cut, Adobe, Avid etc, allow me to kindly reiterate that these NLEs are not necessarily designed for serious audio manipulation or management.
Now I’m not saying you have to go out buy standalone sound editing programs. Just try paying more attention to the audio features within your NLEs, and perhaps give them just as much attention as you would when reaching for your three way colour wheels. Audio, just like “colour” requires consideration and “correction” even when you think you’ve nailed it.
Understanding the audio frequency spectrum is equally important to studying your Kelvins in colour temperature. Like light, it also has tonality, shape and texture. The general standard of audible frequencies audible to the average human is between 20Hz to 20,000Hz (low to high). Some of you may refer to this as bass & treble.
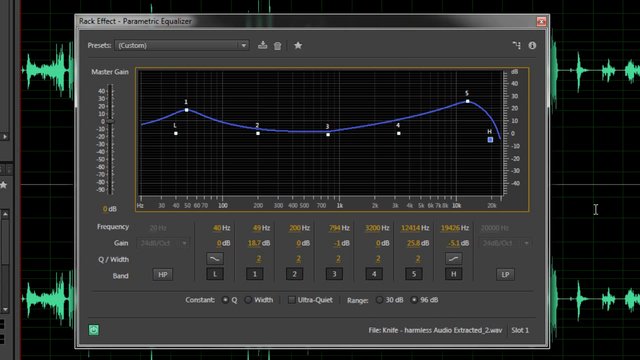
The Equalisation (EQ) Process:
This process involves attenuation & filtering. EQ reshapes timbre, alters harmonic structure and will boost or cut the gain (volume) of any given particular sound. EQ is useful for giving sounds presence, body, and clarity and also handy for getting rid of unwanted sounds. From a technical perspective, EQ is utilised to improve the broadcast/medium standard. It works “surgically” to reduce hiss, hum & rumble.
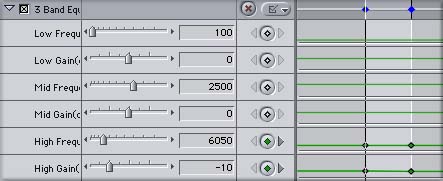
Equalization (EQ) in application:
Like colour temperatures and their light sources, audio has “characteristics”. Through word associations, we can draw references to sound that reside within an audio frequency spectrum. I’ve taken the liberty of providing some examples below that details these characteristics within the various ranges of frequencies. I recommend you refer to the following information the next time you want to tweak or equalise your audio, and experiment with your audio EQ plug-ins to achieve desired results.
20Hz – 200Hz: Low Frequency Range
- Strong/Tactile/Warm – These frequencies usually can add “power” or sound “woody/tubby”. They also contain characteristics that may add rumble. Frequencies also between 60-120Hz are generally attenuated to reduce low-end rumble in dialogue, in order to create more clarity. Various mics and recorders have a parameter called a High-Pass Filter that will perform this function. It’s a good idea to use these when capturing dialogue in an environment plagued by extraneous noise such as traffic and air conditioning,.
200Hz – 500Hz: Low-Mid Frequency Range
- These frequencies can sound full, muddy, fat, robust, boomy, and thumpy. Rolling off frequencies from below 500Hz can make your audio sound thin, clean or tinny.
500Hz – 7,000Hz: Mid Range Frequency Range
- This area of frequencies can add presence, punch, clarity and definition, though be careful when adding too much EQ within this register as it can start sounding horn-like (honky), tinny, nasal, piercing, twangy or metallic (unless those are the sound characteristics you desire). Mid frequency cut in this range can also make your audio sound hollow, mellow or muffled.
7,000Hz – 20,000Hz: High Frequency Range
- This area of frequencies can either enhance or detract from a sound by making them bright, crisp, glassy, tinny, sizzly, edgy, airy or sibilant. It can also render a sound too detailed and close, however rolling off or attenuating these frequencies will mellow, smooth, distance, dull and muffle.
Think about layers. How many sounds or voices can, or should, occupy a frequency band? Contextually, how does one sound relate to another?
Also think about aesthetics. For example, creating something textural. Exploit the psychoacoustic or subtle element, evident when you watch a movie and hear a detailed sound or texture in the background.
Equalisation can also be additive or subtractive. Subtlety different to colour correction in certain instances, subtractive equalisation in audio can improve a sound tremendously. Try this first before adding, as this will usually create clarity, space and separation.
In closing, here are few more tips to consider when applying EQ.
Few people can discern or hear volume or tonal changes of less than 3dB. Search the right frequency before you decide what nuance you should apply to a sound. Sometimes, harsh or brittle sounds may work within context.
Like colour correction or grading, boosting frequencies in audio can also mean additional noise. Boosting EQ in the higher frequency registers can create distortion, more sibilance and clip transients, so use it judiciously.
As for dialogue, always keep track of what you’ve done with reference to voice matching. Voices recorded on set or ADR can sound coherent with intelligent use of EQ.
Remember, this is not a definitive guide. However I’d love to hear from fellow filmmakers on how they process their audio in post. Any feedback or questions are most welcomed. I hope this article has demystified the use of EQ to some degree. Now go do some more research, study &.. remember, practice! 😉

Related Posts


-
Dave Edwards
New Product